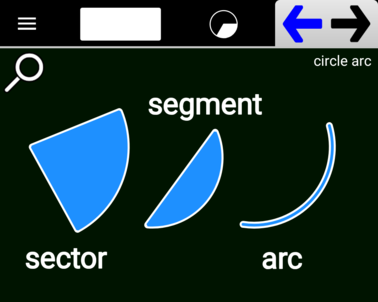
The Circle Arc tool allows you to create these types of shapes:
You first need to define the circle on which the shape will be based. For that you used the second Option Button to choose:
- Center to circumference point
- Circumference point to center
- Circumference point to opposite circumference point
You use the Mark Button
to define the second point (based on your selection above). You can also use the Drag Constraint button to aligned this second point horizontally or vertically with the first point. After you’ve defined the circle, you then need to decide what method to use for defining the arc itself. You can

- Create by Angle
- Create by Depth
Create by Angle means that you define the “sweep” of the arc, that is, the start angle and the end angle. An option button is available to allow you to either define the angle freely or to define the angle in “steps” (increments of a certain value). How the angle will be applied depends also on if the angle is defined to be “minor”, “major”, or exact (such as 30, 60, 90, etc.). Before releasing your finger, use the top option button to set the shape to either “Sector”, “Segment”, or “Arc”. Here’s an example of construction:
Create by Depth is similar to Create by Angle except that the starting and ending points of the arc shape are defined by a chord (a line segment intersecting the circle in two points) that is placed a certain distance from the center of the circle. Here’s an example of construction by depth: